The other parts:
Recap:
- Commissioning the bass: How I decided what to do
- Part 1: Choosing the components
- Part 2: Early progress - the shapes emerge
- Part 3: Ferdinand works the wood.
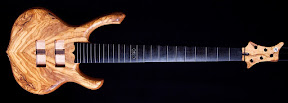
The Bass Emerges...
Continuing the sequence, we see the face emerge from the clamps...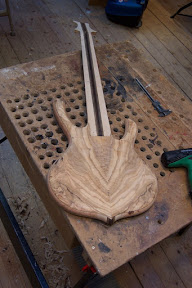
The Inlay
My original plan for my input to the bass was to have a single celtic knot band at the 12th fret: we keep markers along the top, and the board itself is unmarked apart from the 12th fret. I found some great designs, including these -
I figured something around the middle of that picture would be good: done in abalone, with a bit of sparkle. Ferdinand agreed, and I sent the URL of the site across. We worked through this early on, just after settling on the materials for the build.
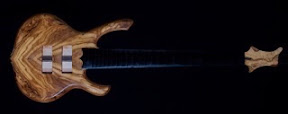
The build progressed nicely: we got to this stage:
And I was getting pretty excited: but then.... argh! The inlays are delayed, so we have to come up with a rapid solution (this happened a week ago last Saturday: with 2 weeks to go!!!)... so I start looking for images I can use. I measured up a different 5-string with similar spacing, and decided 40 x 15mm seems about right. We have another Facetime session, and Ferdinand tells me he knows some guys who have a computer-controlled CNC machine, and he shows me a selection of abalone which the inlay could be made out of. I'm intrigued about what might be possible, and want to keep the core idea of a celtic band.
I'm searching for celtic bands, and I find things like

which is pretty good. I filled in the shape to see how it might look, white-on-black: it wasn't bad, but still not great. And besides, with my geek hat on, I know the computer CNC guys are going to want something which isn't a JPG - they're going to want a vector format (see, I can geek!).
I hunt around and find this: Now granted, this looks pretty pixelated, but... it's an adobe illustrator file - a vector format! This could be an ideal way to get things moving quickly…

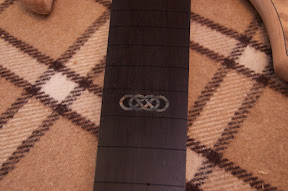
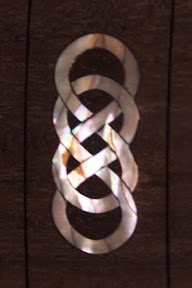
I tell Ferdinand the bottom one is preferable: I didn't twig at the time that it was a pair of infinity signs: it's a nice figure, and it scales to 15x40 well.
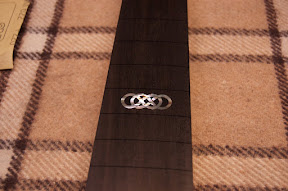
Anyway, I hear back from Ferdinand a couple of days later: The CNC guys were able to rout out the shape nicely, and he then engraved the piece and added black lines to give it the 3-D over/under look - and see the result!
... and when the light hits it right!!!
And after the fretting over the inlay...
And finally - she's got a full set of stainless steel frets!
These are a little more expensive - Ferdinand tells me he uses an entire set of files because they're so hard: this is exactly why I wanted to specify the materials though, longevity and a trouble-free bass!
I did a little editing on my iPad to make a backdrop out of it - you can really see the beautiful work here: the CNC guys made a fine piece, and Ferdinand's engraving has absolutely made the inlay: it's just stunning!
Finally... where the controls go?
This last show is the latest one I've got: I've seen her in one last facetime session, last friday, where Jacco (the God of Wiring, tremble in his Mighty Presence!) and I discussed how the controls would work: a great chat, where the flexibility of tone was paramount - I'm going for the switchbucker pickups, so I want to be able to get as many tones as possible. The recent work I've done on basses with OBP-3 was on basses which were modded, and already had a set layout: this meant stacked pots and blend controls.
Jacco and Ferdinand were kind enough to recommend twin volume pots for the 2 pickups: this bass has a good sized space for 5 controls!
So our final control layout is 2 above, 3 below: we have
- bridge pickup (with push/pull for passive - yay!), neck pickup as 2 separate controls
- bass, mid (with push/pull for the switchable mid on the OBP-3), treble.
That brings us up to date: My next post will be the final build blog post! See you then…
No comments:
Post a Comment